How to Insulate an Old House with Plaster Walls
If your house was built before 1960, there's a good chance your walls are doing almost nothing to keep heat in. You've probably already noticed — one side of the room is fine, the other feels like you left a window cracked. You crank the heat, the furnace runs, and your utility bill climbs anyway.
Connecticut winters are not forgiving. We're in Climate Zone 5A, which means real cold, sustained cold, and heating costs that rank among the highest in the country. Older homes here — the capes, colonials, and two-families that make up a huge chunk of the shoreline housing stock — were built with plaster walls and little to no insulation inside them. That wasn't negligence. Insulation standards back then just weren't what they are now.
The problem is that most homeowners focus on the attic first (which is correct), but then stop. The walls are still hemorrhaging heat, and because you can't see inside them, it's easy to assume there's nothing you can do without tearing everything apart.
There is. And in most cases, you don't have to touch your plaster to do it.
This post walks through the real options for insulating plaster walls in an older home — what works, what the process looks like, what it costs, and where Connecticut rebates can offset the investment.
Listen to our podcast on wall insulation
Why Plaster Walls Make Insulation Complicated
Plaster walls aren't like modern drywall. They're heavier, more brittle, and built in layers — typically three coats of plaster applied over wood lath strips nailed horizontally across the studs. That layered construction is part of why older homes feel so solid. It's also part of why insulating them requires more thought than a standard retrofit.
What's Actually Inside a Plaster Wall
Behind that plaster surface, you've got a wall cavity running between studs — usually 2x4 framing, 16 inches on center. In a home built before 1950, that cavity is almost certainly empty. No fiberglass batts, no cellulose, nothing. Just an air gap between your heated interior and the exterior sheathing.
A few things can complicate what's inside that cavity:
- Fire blocking — horizontal wood blocks installed mid-wall to slow fire spread. Common in older construction. They divide the wall cavity into upper and lower sections, which affects how insulation gets installed.
- Diagonal bracing — some older framing used diagonal boards inside the wall cavity for structural support. These can obstruct fill paths.
- Existing debris — older walls sometimes have sawdust, old newspaper, or deteriorated materials that settled at the bottom of the cavity over the decades.
- Knob-and-tube wiring — if your home still has it, this needs to be evaluated before any insulation work. Covering active knob-and-tube with insulation is a fire hazard and a code issue in Connecticut.
None of these are dealbreakers. But a good contractor will account for all of them before drilling a single hole.
Why You Can't Just Blow In Insulation Without a Plan
The goal with any wall insulation retrofit is to fill the cavity completely — no voids, no gaps, no areas where the insulation settles and leaves the top of the wall unprotected. That sounds simple. It's not always.
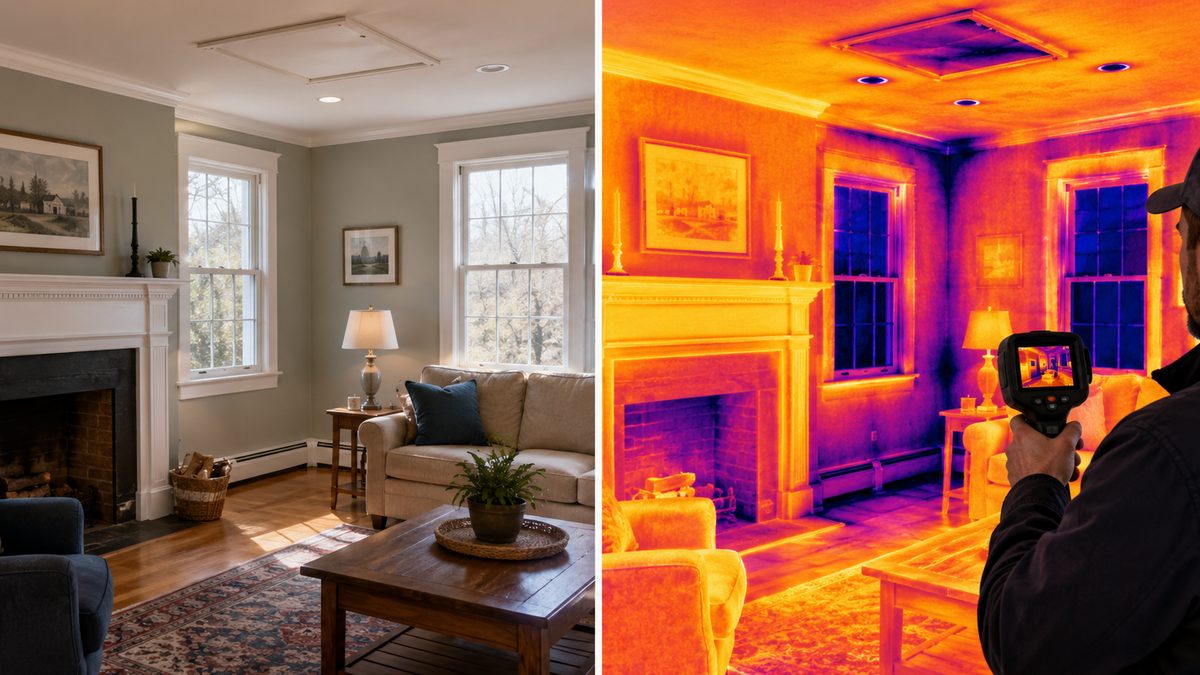
If you just drill a hole at the top of each stud bay and start blowing material in, you might hit a fire block and fill only the bottom half of the wall without knowing it. You might also blow past a diagonal brace and create an uneven fill. Neither problem shows up until you get a thermal scan done later and see exactly where the gaps are.
The right approach involves probing the cavity first — running a small camera or probe through the access hole to check for obstructions — then drilling at the right locations to ensure complete coverage. Dense pack installation in particular requires hitting specific density targets to prevent settling. That's not a DIY-friendly process, and it's one of the reasons wall insulation in older homes is best left to contractors who specialize in retrofit work.
If you want to understand the broader picture of signs your home isn't properly insulated, empty wall cavities are almost always part of that story in Connecticut's older housing stock.
What's actually inside your walls — and how do you find out before spending money? Read: Signs Your Home Isn't Properly Insulated
Your Options for Insulating Plaster Walls
There's no single right answer here. The best approach depends on your wall construction, your budget, whether you're working from the inside or outside, and what you're trying to accomplish. Here's a straight breakdown of what's actually available.
Blown-In Insulation Through Small Holes (The Most Common Retrofit)
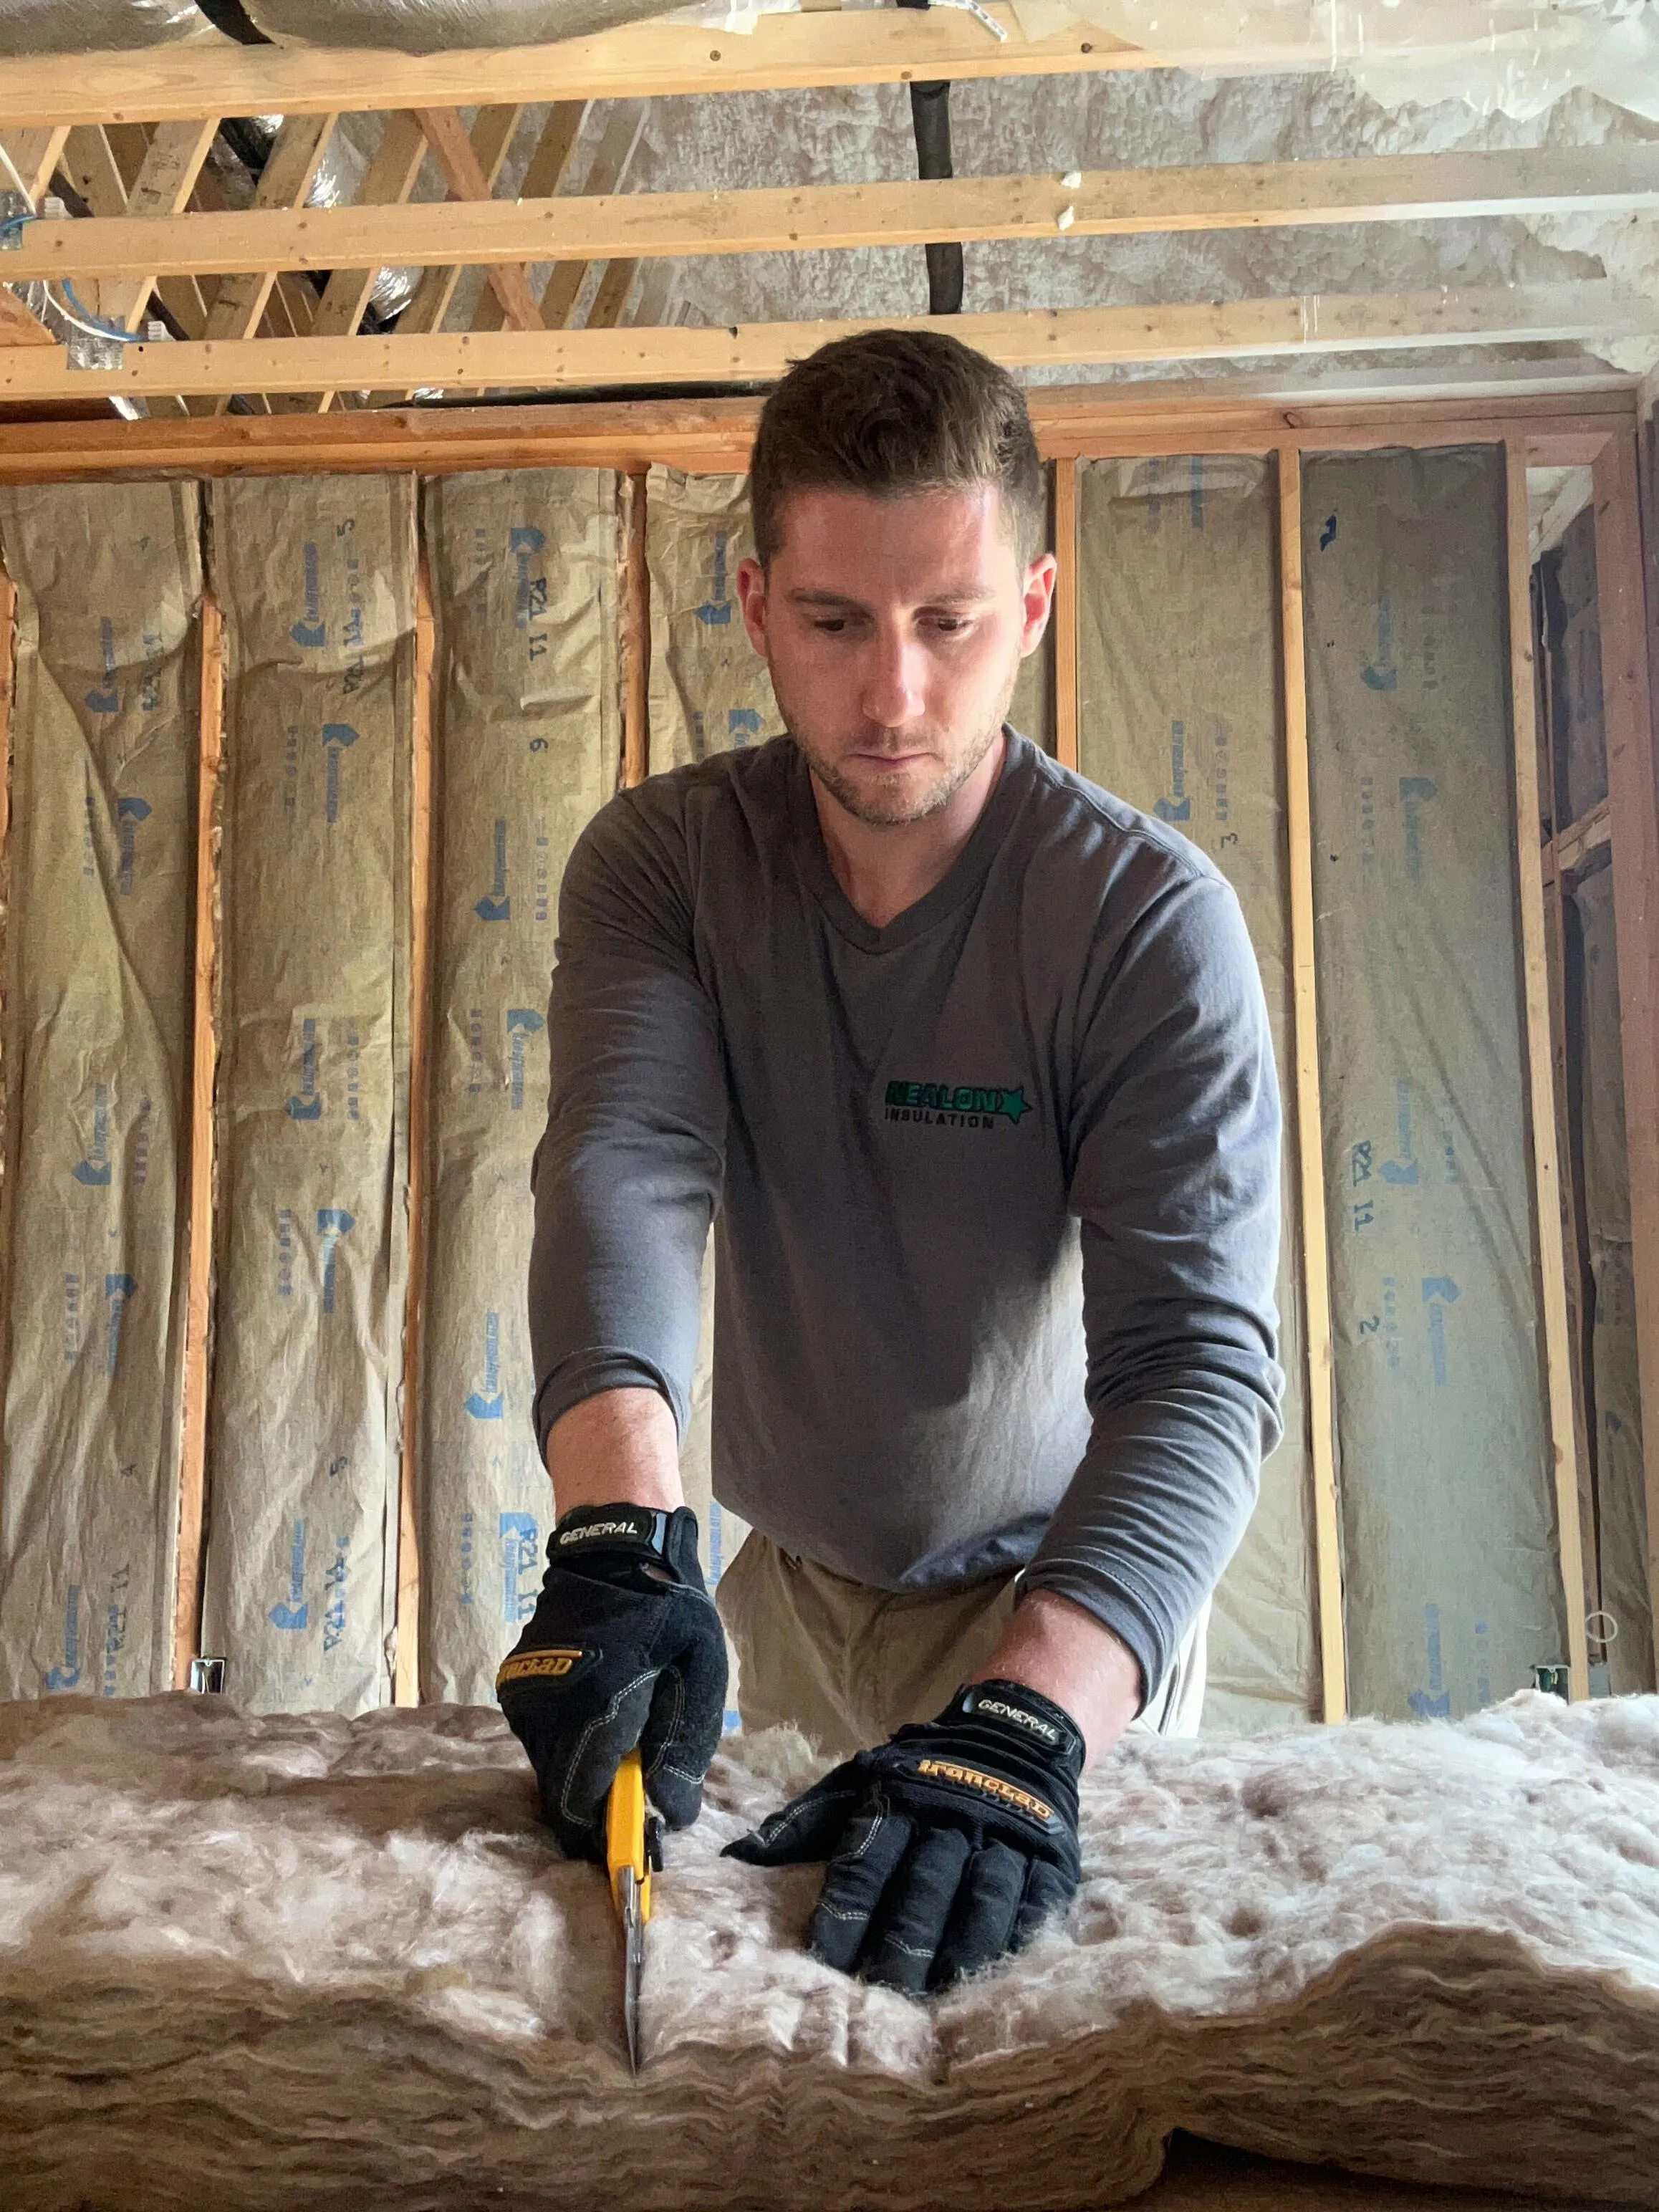
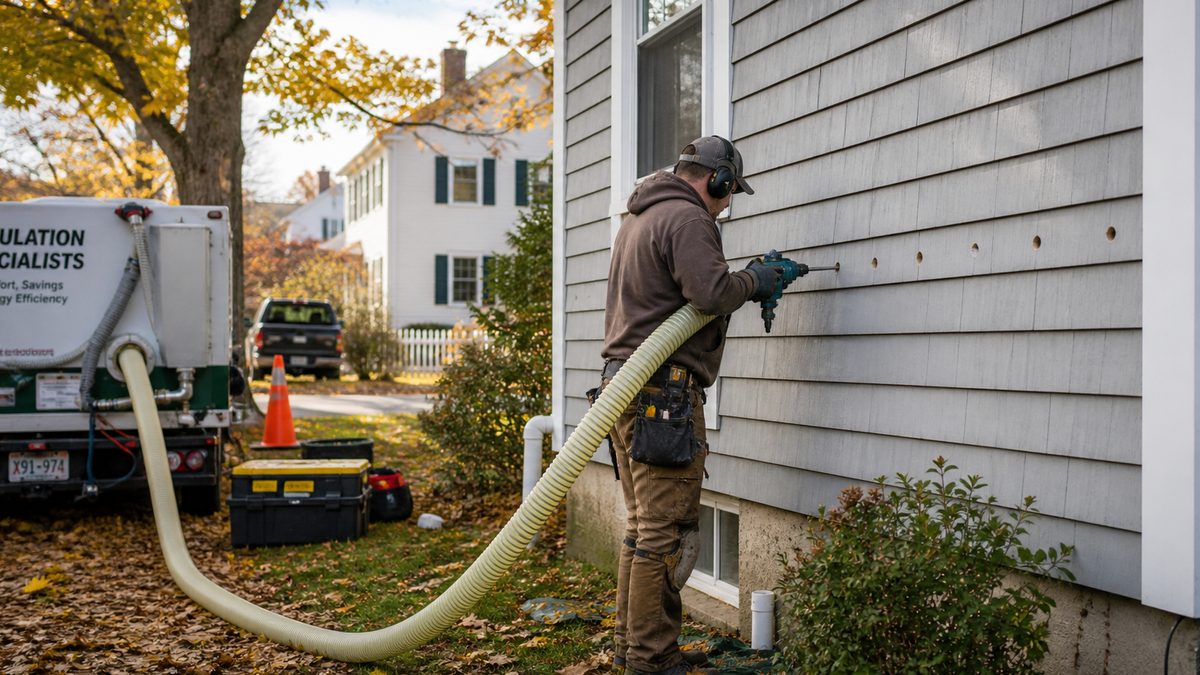
This is the standard approach for insulating existing walls without gutting them. A contractor drills small holes — typically 1.5 to 2 inches in diameter — either through the exterior siding or through the interior plaster, then uses a hose to blow insulation material into each stud bay. Once the cavity is filled, the holes are plugged and patched.
Done correctly, this method is minimally invasive. Most homeowners are surprised by how little disruption it causes. The holes are small, the process is relatively fast, and the wall surface is restored before the crew leaves.
The two most common materials used in this application are cellulose and fiberglass. Which one gets used — and how — matters quite a bit.
Dense Pack Cellulose — The Go-To for Old Homes
If you're insulating plaster walls in an older Connecticut home, dense pack cellulose is usually the right call. Here's why it works well in this specific application:
- It's blown in at high density (typically 3.5 lbs per cubic foot), which means it resists settling over time
- It fills around obstructions better than fiberglass — important given the irregular framing you find in older homes
- Cellulose has some hygroscopic properties, meaning it can absorb and redistribute small amounts of moisture without losing performance — a real advantage in Connecticut's humid summers
- It's made from recycled paper and treated with borate, which gives it natural pest and mold resistance
- It achieves roughly R-3.5 to R-3.8 per inch, so a fully packed 3.5-inch wall cavity gets you to around R-13
For a deeper look at how cellulose handles Connecticut's humidity compared to fiberglass, the material holds up well in the conditions Connecticut throws at it year after year.
Spray Foam in Walls — When It Makes Sense and When It Doesn't
Spray foam gets mentioned a lot, but it's not always the right tool for a plaster wall retrofit. Here's the honest take:
Open-cell spray foam is too soft and low-density for a blown wall application — it won't hold its position inside a wall cavity the way dense pack cellulose does. Closed-cell spray foam delivers higher R-values (around R-6 per inch) and acts as an air and vapor barrier, but it's expensive and can cause moisture problems in older homes if it traps vapor against the wrong side of the wall assembly.
Closed-cell foam in walls makes the most sense in specific situations:
- Rim joist areas in basements
- Areas with chronic moisture exposure
- Spot applications where you need structural rigidity or maximum R-value in a thin space
For whole-wall retrofits in an older plaster home, dense pack cellulose is almost always the more practical and cost-effective choice.
Interior Wall Furring — The Nuclear Option
If your walls are already damaged, you're doing a gut renovation anyway, or you need to meet much higher R-value targets, you can fur out the interior wall surface. This means adding a layer of rigid foam board against the existing wall, then covering it with new drywall.
It's effective. You can hit R-10 or higher with 2 inches of rigid foam, and you get a fresh wall surface in the process. But you're also losing 2 to 3 inches of interior space per wall, and the work involved is substantial — outlets, switch boxes, door and window casings all need to be extended. It's a real renovation, not a retrofit.
Most homeowners don't go this route unless they're already tearing into the walls for another reason. But if you're doing a major renovation on an older home, it's worth building this into the plan rather than treating it as an afterthought.
Is blown-in insulation the right call for your home — or is there a better fit? Read: What Are the Different Types of Blown-In Insulation?
The Drilling Process — What Actually Happens in Your Home
This is the part most homeowners are nervous about. You've got plaster walls that have held up for 80 years, and now someone wants to drill holes in them. It's a fair concern. Here's exactly what the process looks like so there are no surprises.
Drilling From the Outside vs. the Inside
One of the first decisions a contractor makes is where to drill — through the exterior siding or through the interior plaster. Both approaches work. Each has tradeoffs.
Drilling from the outside is generally preferred when the home has wood clapboard or shingle siding. The contractor removes a section of siding, drills through the sheathing into the wall cavity, fills the bay, plugs the hole, and reinstalls the siding. When done right, it's nearly invisible from the street and avoids touching the plaster entirely. This is the most common approach on older Connecticut homes with traditional wood siding.
Drilling from the inside makes more sense when the exterior siding is difficult to work with — brick, stucco, or fiber cement, for example — or when the interior walls are already damaged and due for repair anyway. The holes go through the plaster surface, which requires more careful patching afterward, but keeps the exterior completely untouched.
A few things happen before the first hole gets drilled regardless of which side is chosen:
- The contractor locates stud bays using a stud finder or probe
- Each bay is checked for obstructions — fire blocking, diagonal bracing, existing debris
- Drill locations are marked to ensure complete cavity coverage, including above and below any fire blocks
Patching and Finishing After the Job
This is where a lot of homeowners have bad experiences — not with the insulation itself, but with the patch work left behind. Plaster is unforgiving. A patch that looks fine on day one can crack or telegraph through paint within a year if it wasn't done properly.
When drilling from the outside, the plugs are typically wood or plastic, sealed and covered when the siding goes back on. Done correctly, there's nothing visible.
When drilling from the inside, the process is more involved. The plugs go in, then the surface gets skim coated and feathered to blend with the surrounding plaster texture. If the original plaster has a sand or skip-trowel finish, matching it takes skill. This is worth asking about specifically when you're getting quotes — who does the patching, what's the finish quality, and is it included in the price.
A reputable contractor won't leave you with a wall full of obvious patches. But it's worth setting that expectation upfront rather than assuming.
What does insulation installation day actually look like inside your home? Read: What to Expect on Insulation Installation Day
What to Expect in Terms of Results
Let's be straight about this: insulating your walls is not going to cut your heating bill in half. Anyone who tells you otherwise is overselling it. What it will do is make a real, noticeable difference in comfort — and over time, the energy savings add up.
R-Value Gains in a Typical Plaster Wall
Most older homes have 2x4 wall framing, which gives you a cavity depth of roughly 3.5 inches. A fully packed dense pack cellulose install in that space gets you to around R-13. That's not spectacular by modern standards — current Connecticut building code targets R-20 or better for new construction walls — but it's a massive improvement over R-0, which is what an empty wall cavity delivers.
For most older homes, getting from R-0 to R-13 is the single biggest thermal improvement you can make to the wall assembly short of a full gut renovation.
Wall Insulation Works Best as Part of a System
Here's where a lot of homeowners get frustrated. They insulate the walls, and the house still feels drafty. The reason is usually air sealing — not insulation failure.
Insulation slows heat transfer through conduction. Air sealing stops heat loss through convection — the movement of air through gaps, cracks, and penetrations. A wall full of cellulose still lets cold air sneak in around electrical outlets, through gaps at the top and bottom plates, and around window and door rough openings if those areas haven't been sealed.
The most effective approach combines wall insulation with targeted air sealing and insulation working together at the same time. If you've already had your attic insulated and air sealed, adding wall insulation is the logical next step. If you haven't done the attic yet, start there — it's where the most heat escapes in a typical Connecticut home and where the return on investment is highest.
Think of it this way: the attic is the biggest hole in the bucket. The walls are the next biggest. Fix them in that order and you're building a genuinely tighter, more efficient home layer by layer.
Comfort vs. Energy Savings — Setting Honest Expectations
The comfort improvement from wall insulation tends to be more immediately noticeable than the energy savings. Cold walls radiate coldness into a room — even if the air temperature is 70 degrees, sitting near an uninsulated exterior wall in January feels colder than it should. Once those walls are filled, that radiative chill goes away. Rooms feel more even. The furnace cycles less.
On the energy side, most homeowners see a meaningful reduction in heating and cooling costs, but the exact number depends on how leaky the house was to begin with, how much of the wall area got treated, and what other improvements were made at the same time. A whole-house energy audit before and after is the most reliable way to measure actual performance gains.
How Much Does It Cost to Insulate Plaster Walls in Connecticut?
Cost is where a lot of homeowners hit pause. Wall insulation in an older home isn't cheap, but it's also not as expensive as most people assume — especially once you factor in what's available through Connecticut's rebate programs.
Typical Cost Range for Wall Insulation Retrofits
Pricing for blown-in wall insulation varies based on house size, wall height, accessibility, siding type, and how much prep work is involved. That said, here are realistic ballpark numbers for Connecticut homeowners:
These numbers assume dense pack cellulose installed by a professional contractor. Spray foam applications will run higher. Homes with brick or stucco exteriors, complex framing, or significant knob-and-tube wiring remediation needed beforehand will also push costs up.
Get at least two quotes, and make sure each one specifies the material, the target density, the access method, and what patching is included. A quote that doesn't spell those things out isn't a complete quote.
Energize CT Rebates — What's Available
Connecticut homeowners have access to rebates through Energize CT, the state's energy efficiency program administered through Eversource and United Illuminating. Wall insulation is a rebate-eligible measure, and the savings can be meaningful.
Current rebate structure for insulation work generally includes:
- Rebates based on the amount of insulation installed (calculated per square foot or per project)
- Additional incentives for whole-home energy upgrades when multiple measures are completed together
- Income-qualified programs that can cover a significant portion of project costs for eligible households
The specific rebate amounts update periodically, so the best move is to check directly at energizect.com or ask your contractor — a reputable Connecticut insulation contractor will know exactly what's available and can help you navigate the paperwork.
One important note: to qualify for rebates, the work typically needs to be performed by a participating contractor and meet specific installation standards. This is another reason DIY wall insulation doesn't make much financial sense in Connecticut — you'd be leaving rebate money on the table.
How to Think About Payback Period
Payback period on wall insulation depends on your current energy usage, fuel type, and how much of the house gets treated. A rough rule of thumb for a typical Connecticut home:
- Oil or propane heat: payback period of 5 to 8 years on wall insulation alone
- Natural gas heat: closer to 8 to 12 years
- Heat pump systems: varies widely based on electricity rates and usage patterns
Those numbers improve significantly when rebates are applied upfront and when wall insulation is combined with other efficiency measures like attic insulation and air sealing. The comfort gains — less drafts, more even temperatures, quieter rooms — start on day one and don't have a payback period. Those are just better to live in.
How do Connecticut insulation rebates actually work — and what does it take to qualify? Read: Step-by-Step Guide to Apply for Energize CT Rebates
Conclusion
Insulating an old house with plaster walls isn't the most straightforward project, but it's far from impossible. The walls in most pre-1960 Connecticut homes are sitting empty, quietly bleeding heat every winter while the furnace works overtime. Dense pack cellulose through small drilled holes is a proven, minimally invasive fix that works with your existing wall construction instead of against it.
The key things to take away from all of this:
- Empty plaster wall cavities are costing you real money every heating season
- Blown-in dense pack cellulose is the most practical retrofit for most older homes
- The drilling process is less disruptive than most homeowners expect
- Wall insulation works best as part of a broader system that includes attic insulation and air sealing
- Connecticut rebates through Energize CT can meaningfully reduce your out-of-pocket cost
- Knob-and-tube wiring needs to be addressed before any insulation work begins
If your house was built before 1960 and you've never had the walls insulated, there's a very good chance this is one of the highest-return improvements you can make to the building envelope. Not because it's glamorous — it isn't — but because going from R-0 to R-13 across every exterior wall in the house adds up fast.
The work is straightforward when it's done right. The results are immediate. And your heating system will thank you.
👉 Contact Nealon Insulation for wall insulation— if your old house has plaster walls and you're tired of heating the outdoors, let's talk about what a wall insulation retrofit actually looks like for your home.
Frequent Questions About Insulating Old Houses with Plaster Walls
Will drilling holes damage my plaster walls?
This is the number one concern we hear from homeowners with older homes, and it's a fair one. Plaster that's survived 80 years deserves some respect. The honest answer is: done carefully, the drilling process causes minimal damage — but plaster is brittle, and there's always some risk of cracking or chipping around the drill point if the work isn't done with the right bit and the right technique.
Most experienced contractors use a hole saw rather than a spade bit, which produces a cleaner cut with less vibration. Drilling from the exterior through the siding and sheathing avoids the plaster entirely. When interior access is necessary, the plugs and patch work should restore the wall surface to a condition that's indistinguishable from the surrounding plaster after painting. Ask your contractor specifically about their patching process and whether it's included in the quote — this is where corners sometimes get cut.
Can I insulate plaster walls myself?
Technically, you can rent a blowing machine and buy bags of loose-fill insulation. But wall insulation in an older home is one of those jobs where the execution matters as much as the materials, and the margin for error is low.
Dense pack cellulose requires hitting a specific density target — around 3.5 lbs per cubic foot — to prevent settling over time. Too light and you'll have voids within a few years. The equipment rental and material cost also eat into any savings quickly, and you won't qualify for Energize CT rebates unless the work is done by a participating contractor. For attic loose-fill insulation, DIY is a reasonable option for some homeowners. For wall retrofits in a plaster home, it's generally not worth the risk.
How do I know if my walls are already insulated?
There are a few ways to check without opening up a wall. The simplest is to remove an electrical outlet cover on an exterior wall, turn off the breaker first, and shine a flashlight into the gap around the electrical box. If you see cellulose, fiberglass, or foam, there's insulation present. If you see bare wood framing and empty space, there isn't.
A more thorough method is a thermal imaging scan, either done by an energy auditor or a contractor with an infrared camera. This shows you exactly where insulation is present and where it's missing across the entire wall surface — including areas where insulation may have settled and left voids at the top of the cavity. If you're serious about understanding your home's thermal envelope before spending money, a home energy audit is worth the investment.
Is dense pack cellulose or spray foam better for plaster walls?
For most whole-wall retrofits in older plaster homes, dense pack cellulose is the better choice. It fills irregular cavities well, handles Connecticut's humidity without moisture problems, resists settling, and costs significantly less than closed-cell spray foam. It also doesn't create the vapor barrier issues that closed-cell foam can cause in older wall assemblies that were designed to dry in both directions.
Closed-cell spray foam has its place — rim joists, areas with chronic moisture exposure, and situations where maximum R-value in a thin space is the priority. But as a blanket solution for insulating plaster walls throughout an older home, it's usually overkill on cost and carries more risk of trapping moisture in the wall assembly if the vapor dynamics aren't carefully thought through.
Does wall insulation qualify for Connecticut rebates?
Yes, wall insulation is a rebate-eligible measure under the Energize CT program. The rebate amount is calculated based on the scope of work and the materials installed. To qualify, the work needs to be performed by a participating contractor and meet program installation standards — which is another reason to hire a contractor who knows the program rather than attempting a DIY install.
Income-qualified households may be eligible for deeper incentives that cover a larger share of project costs. The rebate structure does get updated periodically, so the best approach is to confirm current amounts directly at energizect.com or with your contractor before the project begins. A good contractor will factor the rebate into the overall cost conversation from the start.
Related Articles

Let's Work Together
Ready to transform your home into an energy-efficient haven? Schedule your free energy assessment today and experience the Nealon difference for yourself.