Blown-In Insulation Installation Process: What to Expect from Start to Finish
If you’ve ever heard the phrase “we’ll just blow insulation into the attic,” it probably sounded a little too casual for something happening inside your house. In reality, the blown-in insulation installation process is one of the cleanest, quickest, and most effective ways to tighten up a drafty home, especially in older Connecticut houses that were built before energy efficiency was even a thing.
So what actually happens during a blown-in insulation job?
No, we don’t just roll up, point a hose, and hope for the best. A professional installation is a coordinated process: assessing your attic, prepping for air sealing, blowing insulation to the right depth and density, and verifying that every inch is covered.
Homeowners usually call us with the same questions:
- How long does it take?
- Is it messy?
- Do I need to do anything to prepare?
We’ll walk you through exactly what to expect—from the moment our truck pulls up to the final cleanup—so you know how the process works and what kind of comfort upgrade you’re really getting.
Step 1: Inspection and Prep Work
Before a single pound of insulation hits your attic, we start with one of the most important steps: the inspection and prep work. This is where we figure out what your home actually needs, and just as importantly, what it doesn’t.
A professional blown-in insulation installation process always begins with a close look at the attic. We check how much insulation is already up there, where air is leaking, and whether there’s any sign of moisture, mold, or pest damage. Those gaps around can lights, plumbing penetrations, and attic hatches? They’re basically little chimneys that let warm air escape all winter long.
If existing insulation is damaged, contaminated, or underperforming, we’ll remove it before moving forward. A professional insulation removal company ensures you’re not building on a bad foundation.
Once we’ve mapped out those problem spots, we handle the air sealing—closing every crack and penetration with spray foam or caulk to make sure the insulation can actually do its job. (Fun fact: skipping this step is why some homeowners never see the full energy savings they expected.)
Then comes the prep work. We’ll cover storage areas, protect walkways, and make sure the attic access is clean and safe. Homeowners don’t have to move mountains, just make sure we can get to the hatch and that any delicate items nearby are tucked away.
By the time this stage is done, your attic is sealed, clean, and ready for the main event: blowing in the insulation that locks in comfort and efficiency for years to come.
Step 2: Choosing the Right Type of Blown-In Insulation
Before the machine ever fires up, we decide which material makes the most sense for your home. The two main options are cellulose and fiberglass, and both can deliver top-tier performance when installed correctly. The choice really depends on your home’s layout, your goals, and sometimes your budget.
Cellulose insulation is made from recycled paper that’s been treated for fire and pest resistance. It’s dense, great at stopping air movement, and perfect for older homes with irregular framing or lots of gaps to fill. Think of it as the heavyweight champ — tough, snug, and eco-friendly.
Fiberglass blown-in insulation is lighter and more “fluffy,” made from fine glass fibers. It’s clean, won’t settle much over time, and performs beautifully in attics with good airflow and newer construction. Fiberglass is also great for homeowners who prioritize indoor air quality since modern products are formaldehyde-free and low in dust.
At Nealon Insulation, we’ll walk you through the pros and cons during the attic inspection. We consider factors like existing insulation, roof ventilation, and your comfort goals before recommending a material. In short: no guessing, no upselling — just the right insulation for your house, installed the right way.
Step 3: Setting Up the Blower and Equipment
Now that your attic’s sealed and ready, it’s time for the fun part — the gear.
The heart of any blown-in insulation installation process is the blower machine. Think of it as a high-powered snowblower for insulation — one end feeds in the material (cellulose or fiberglass), the other sends a steady stream of fluffy energy savings through a long hose straight into your attic.
Our setup starts outside the home, usually in the truck or trailer. That’s where the insulation bags are loaded into the machine and fluffed apart to the right consistency. From there, the insulation travels up through a heavy-duty hose that we carefully snake through your attic access. The machine meters out just the right amount of material — no overstuffing, no thin spots.
Here’s the key difference between DIY and professional blown-in insulation installation: control.
A trained tech adjusts the air pressure, feed rate, and hose placement on the fly to make sure every inch of the attic floor gets even coverage. It’s a balance of art and science — and a big reason the results last decades.
Before we start blowing, we’ll double-check that the attic baffles (those cardboard or foam channels near the roof edges) are in place to keep ventilation clear. We also install depth markers to measure the target R-value — that’s how we ensure you’re getting the insulation performance you paid for, not guesswork.
Once everything’s prepped and calibrated, the blower fires up, and the transformation begins.
Step 4: Blowing in the Insulation
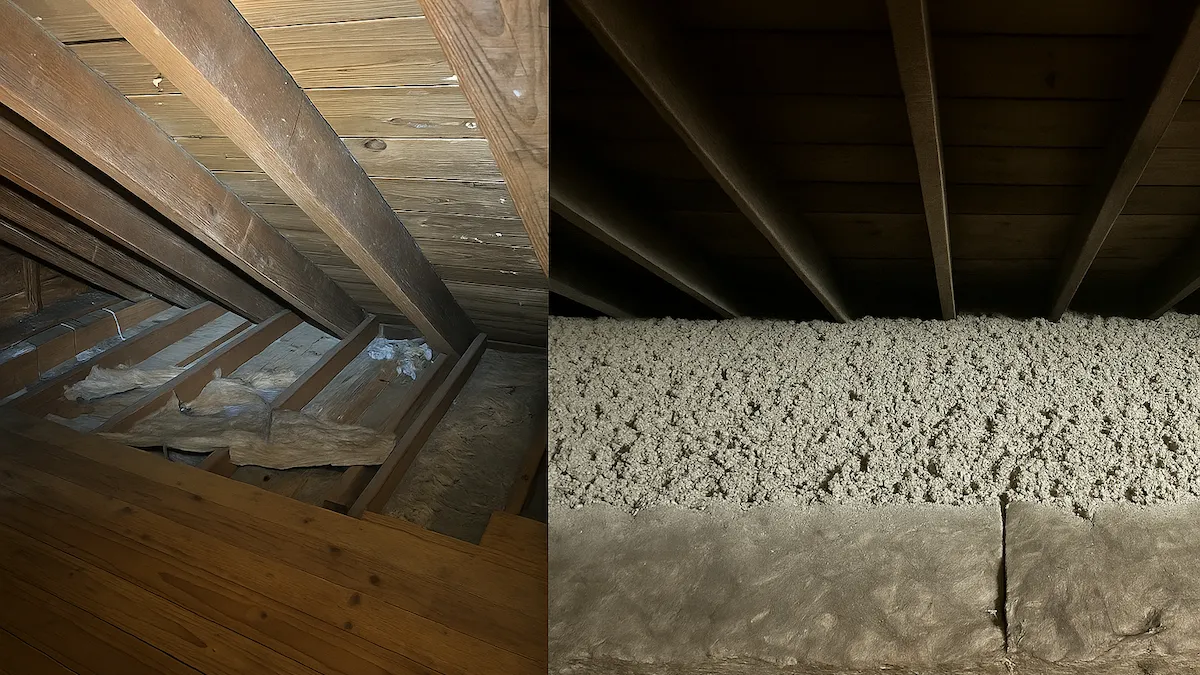
Here’s where the magic happens — and where the term “blown-in insulation” finally makes sense. Once the prep is done and the machine’s humming, we start filling the attic with a thick, even blanket of insulation that seals in warmth like a down comforter for your home.
During the blown-in insulation installation process, one technician feeds insulation into the blower while another works inside the attic, guiding the hose. The goal is full, uniform coverage — no gaps, no low spots. We move methodically, layering the insulation until it reaches the depth needed to hit your target R-value (usually R-49 to R-60 for Connecticut attics).
If we’re using cellulose insulation, it’s typically made from recycled paper that’s treated to resist fire, mold, and pests. Fiberglass blown-in insulation, on the other hand, is made of spun glass fibers that are lightweight, clean, and great for attics with higher ventilation. Both materials perform exceptionally well when installed correctly — the real difference comes down to the home’s layout and your goals.
The blowing process looks simple from the outside, but there’s precision in every pass. We control air pressure, flow rate, and nozzle direction to avoid uneven spots or thin coverage near eaves and corners. Done right, the result is a seamless thermal blanket that keeps warm air in during winter and hot air out during summer.
When the insulation hits the right depth markers across the attic floor, the machine winds down — and you’re already 90% of the way to a more efficient home.
Step 5: Cleanup and Quality Check
Once the insulation is in place and the machine winds down, we shift gears from installation to inspection. A good blown-in insulation installation process doesn’t stop when the hose turns off — it ends when the attic looks clean, even, and perfectly sealed.
First comes the cleanup. Our crew vacuums up any loose material near the hatch, wipes down walkways, and removes protective coverings. We treat your home like a workspace we’d want in our own house — no dust clouds, no mess left behind. The only thing that should look different is a thicker, fluffier attic floor.
Next, we handle the quality check. This is where experience really shows. We double-check the insulation depth against the target R-value, making sure the coverage is consistent across joists and corners. Some areas are spot-measured with rulers; others are verified using thermal imaging cameras to confirm there are no cold spots or voids hiding under the surface.
If we spot any thin sections, we top them off until the attic is perfectly even. We also recheck baffles, attic vents, and the hatch seal to make sure airflow and insulation balance are just right. It’s all part of ensuring your attic performs exactly the way it should — warm in winter, cool in summer, and energy-efficient year-round.
By the time we’re done, you’ll barely know we were there — except when your next utility bill arrives a little lower.
Step 6: What Homeowners Can Expect After Installation
Once the last bit of insulation is in and the crew packs up, the results start working immediately — even if you can’t see them. The beauty of the blown-in insulation installation process is that it delivers a comfort upgrade you can feel before you ever see it on your energy bill.
Most homeowners notice the difference within a day or two. Rooms that used to run cold suddenly feel even. Drafts around the ceiling or upstairs hallway disappear. In summer, your air conditioner doesn’t work as hard to keep things cool. In winter, your furnace runs less often — and your house holds onto that warmth like it’s supposed to.
And then there’s the efficiency factor. When insulation is installed evenly and air leaks are sealed, your home stops hemorrhaging conditioned air. That means lower monthly heating and cooling costs — often enough to pay back the project in just a few years. Many Connecticut homeowners even qualify for rebates through Energize CT, making the upgrade even more affordable.
On top of that, you’ll enjoy a quieter home. Blown-in insulation naturally muffles sound, whether it’s from street noise, footsteps, or howling winter wind.
So what should you expect after installation?
- Consistent temperatures year-round
- Noticeably reduced drafts
- Lower energy bills
- A more comfortable, quieter home
In short, you’ll feel like you’re living in the same house — just one that finally performs the way it should.
Common Questions about Blown-In Insulation
Can blown-in insulation be installed in walls, or is it just for attics?
Blown-in insulation can be installed in both attics and walls. For walls, installers drill small holes between studs, blow in insulation under pressure, and patch the holes after. This method improves comfort without removing drywall and is especially useful in older homes with uninsulated wall cavities.
Will blown-in insulation settle or lose effectiveness over time?
Blown-in insulation may settle slightly over time, but proper installation prevents performance loss. Dense-packed cellulose insulation retains its R-value for decades when installed at the correct depth and density. Professional installation ensures compression doesn’t cause gaps, preserving energy efficiency and comfort long-term.
Is blown-in insulation safe for my family and pets?
Blown-in insulation is safe for families and pets when installed properly. Cellulose uses recycled paper treated with non-toxic fire retardants, while fiberglass options are formaldehyde-free. Installers seal off the work area to control dust, and there’s no lingering smell or residue after the job is done.
Does blown-in insulation help with noise reduction?
Blown-in insulation helps reduce noise by absorbing sound vibrations. It minimizes outside noise, echo between floors, and appliance hum, leading to noticeably quieter rooms. While not a soundproofing product, it significantly improves acoustic comfort throughout the home after installation.
Will blown-in insulation affect my roof or shingles?
Blown-in insulation does not affect your roof or shingles when installed correctly. It stays on the attic floor and avoids contact with the roof decking. By improving attic ventilation and stabilizing temperatures, it helps prevent ice dams, reduce heat buildup, and extend shingle lifespan.
Why Professional Installation Matters
Here’s the thing about blown-in insulation — it’s one of those projects that looks simple until you try it yourself. Renting a blower from a big box store and firing cellulose into your attic might seem like an easy weekend job, but there’s a big difference between getting insulation in and getting insulation right.
Professional installation isn’t just about speed; it’s about precision.
A trained crew knows how to calculate the right R-value, adjust air pressure, and maintain consistent depth across joists and corners. We’re watching airflow, moisture patterns, and ventilation balance the whole time — the kind of details that make the difference between “sort of insulated” and airtight and efficient for the next 20 years.
Then there’s the cleanup, safety, and accountability. A professional blown-in insulation installation means the attic hatch gets sealed, ventilation stays clear, and the insulation performs exactly the way it’s supposed to. No guesswork, no shortcuts, no dust-filled mess left behind.
Connecticut homeowners call Nealon Insulation because this isn’t our first attic — it’s our thousandth. After 48 years insulating homes across the shoreline, we’ve seen every kind of roofline, crawlspace, and surprise raccoon nest you can imagine. Our process is fast, clean, and built to last.
The Bottom Line
Blown-in insulation might not be glamorous, but it’s one of the smartest upgrades you can make to an older Connecticut home. It’s fast, clean, and delivers real, measurable comfort — not just a line on your energy audit. The process may only take a few hours, but the difference lasts for decades.
When done right, you don’t just get insulation — you get a tighter, quieter, more efficient home that feels better every single day.
👉 Ready to make your home warmer, quieter, and more efficient?
Contact Nealon Insulation today to schedule your blown-in insulation installation and start saving on energy bills for good.
Related Articles


Let's Work Together
Ready to transform your home into an energy-efficient haven? Schedule your free energy assessment today and experience the Nealon difference for yourself.