How to Price an Insulation Job (Straight from the Contractor’s Notebook)

If you’ve ever gotten a quote for insulation work and thought, “Where is this number even coming from?” — you’re not alone.
We get it. Home improvement pricing can feel like a black box. So let’s open it up. This post breaks down how insulation pricing works — at least for us at Nealon Insulation — so you can make better-informed decisions about your home.
The Building Blocks of a Quote
Every insulation project has three core pricing components:
- Materials
- Labor
- Margin (which covers overhead as well as a modest profit for us… we gotta eat too!)
Let’s break each one down.
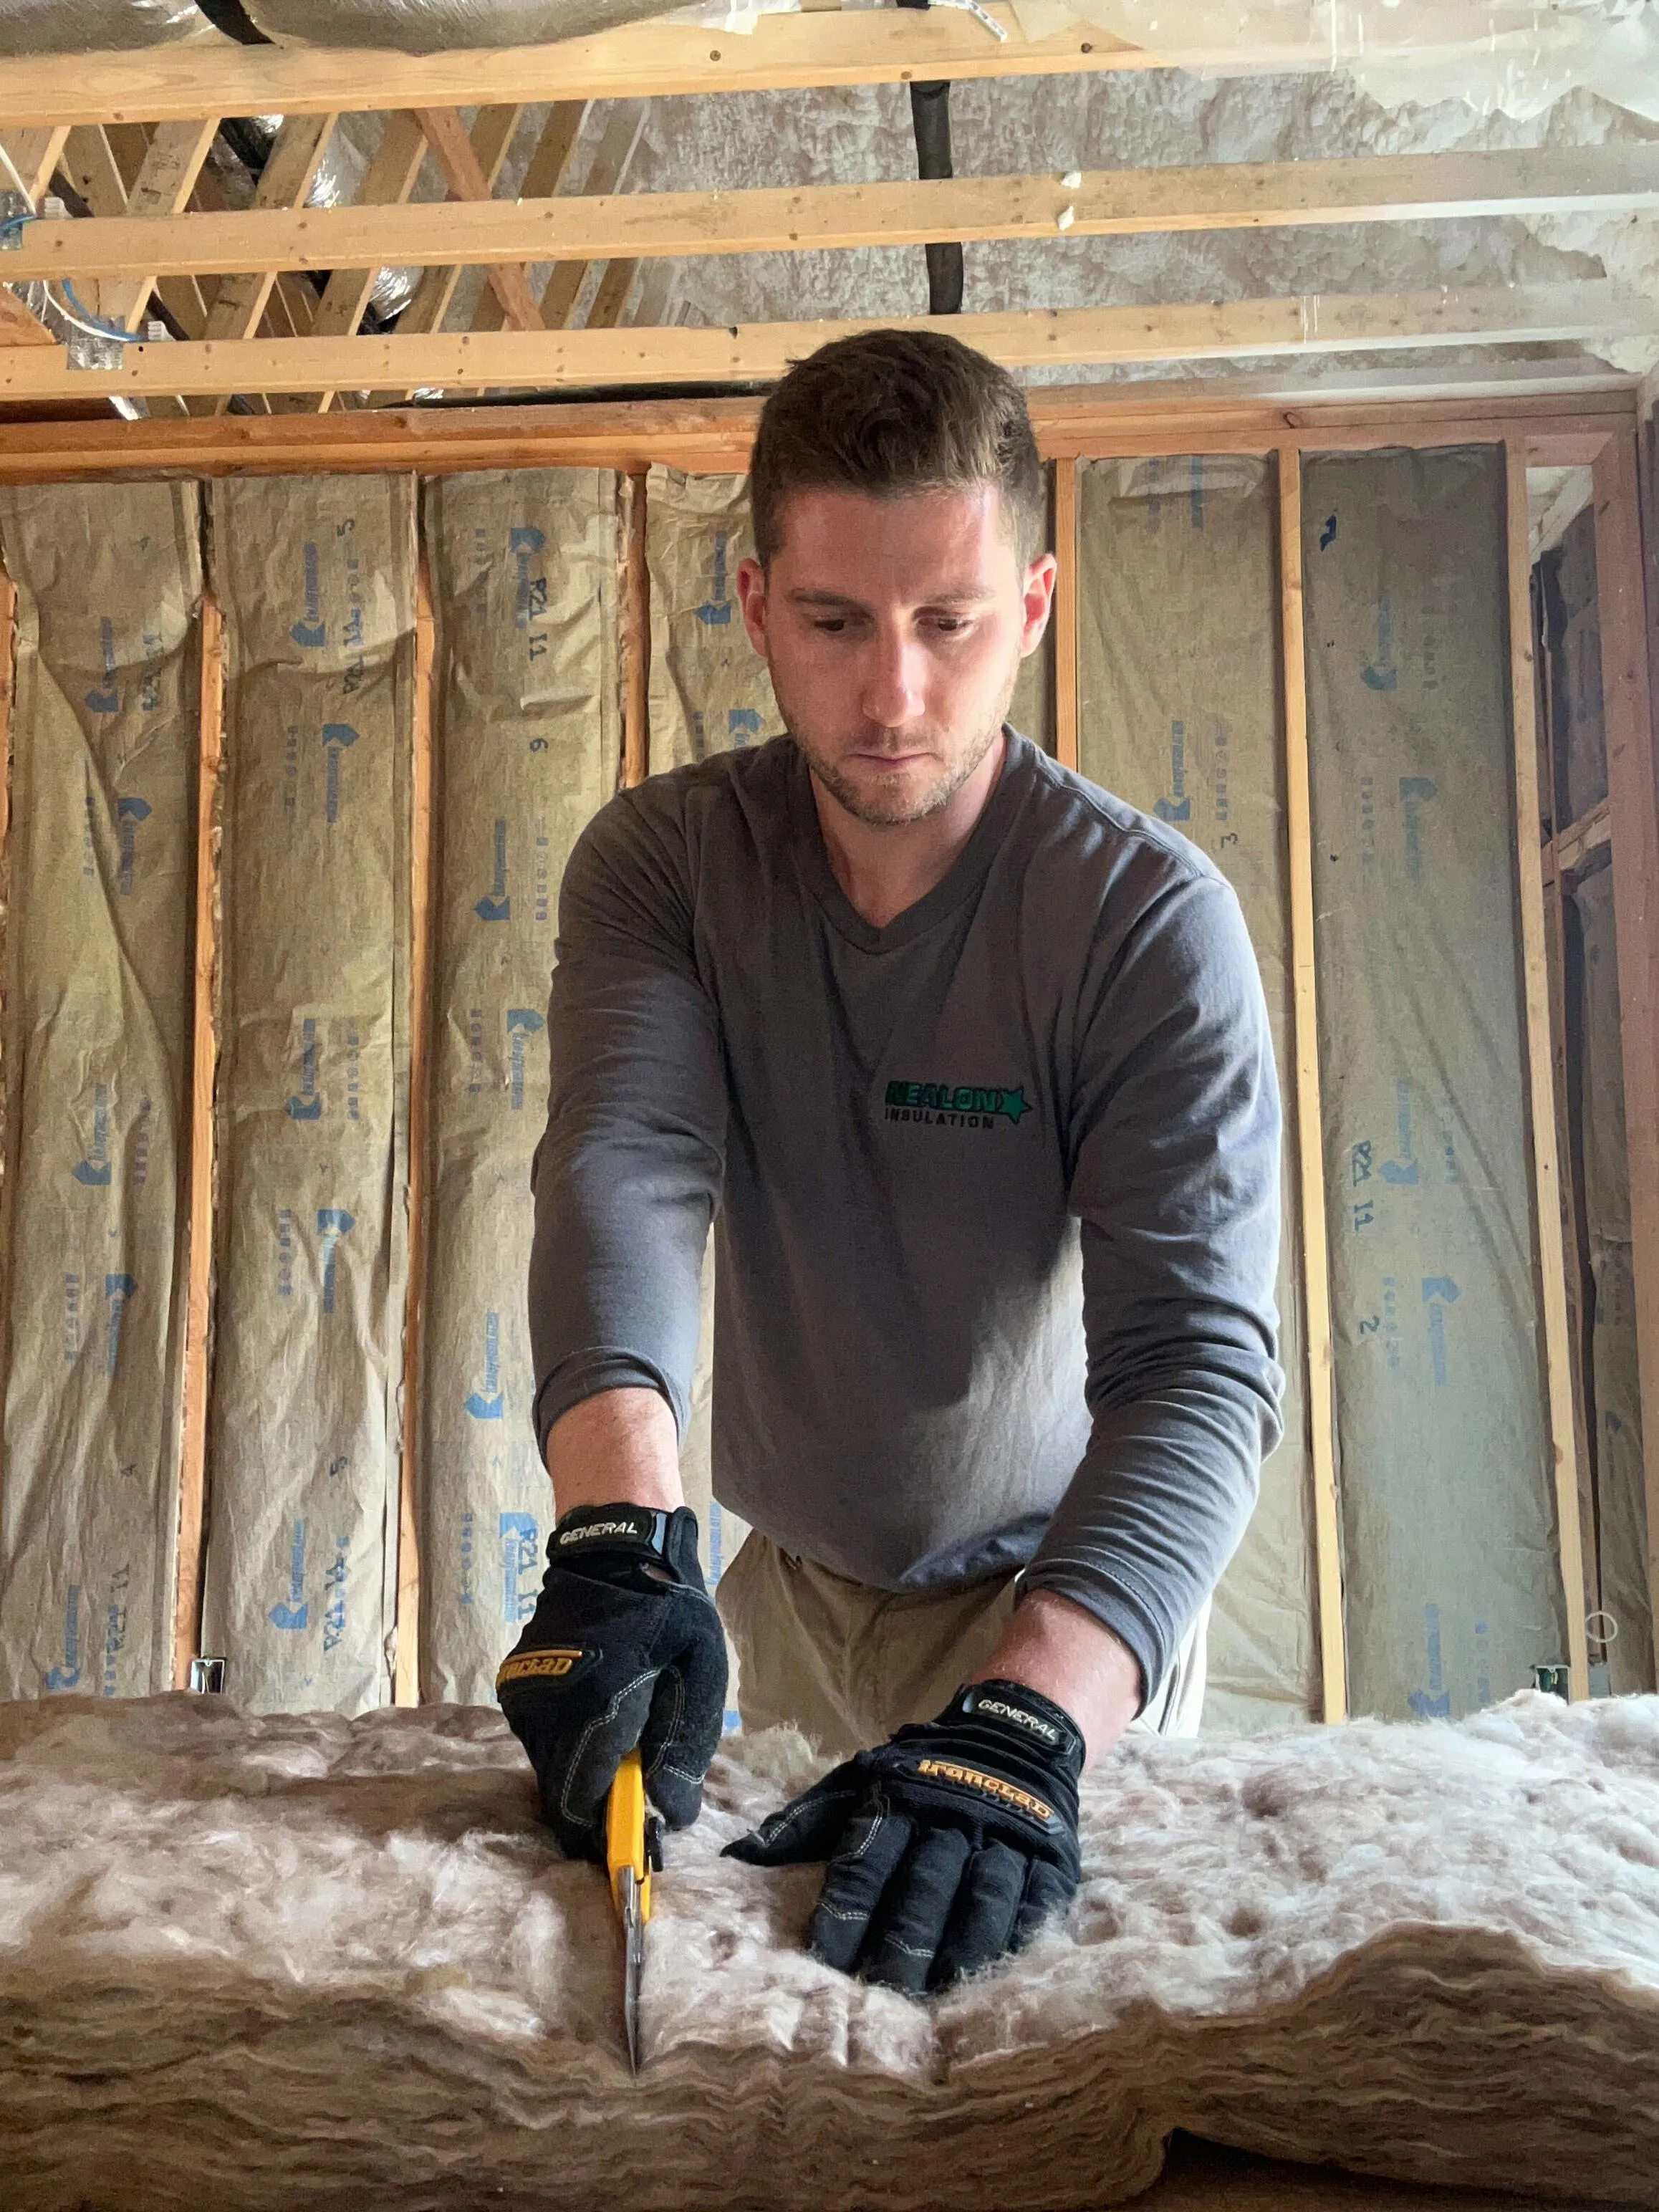
1. Materials: What You’re Putting in the Walls (or Attic or Basement)
First up: materials. This part’s pretty cut and dry.
Based on the size of the space and the type of insulation you need — fiberglass batts, spray foam, cellulose insulation, etc. — we estimate how much product is needed based on the square footage and necessary R-value which is essentially measured by thickness in inches.
We know the cost per bag, batt, or board foot (square foot by inch) of material. Multiply that by the quantity needed, and you’ve got your material cost!
Simple as that! It’s transparent and straightforward — no magic here…
But next come’s the trickier part…
2. Labor: Who’s Installing It, and How Long will It Take
This is where things start to vary a bit more.
We do our best estimate how many total hours it will take to complete the job, from setup to cleanup. Then we multiply that by the average hourly labor cost across our crew. Our goal is to be as efficient as possible with this to ensure that you don’t get overcharged and everyone comes out a winner.
But it’s important to note labor isn’t just the physical act of installing insulation. It includes things like:
- Driving to your property
- Setting up tools and safety gear
- Protecting your home’s surfaces
- Cleaning up so you’re not left with a mess
If your home is older, has tight crawlspaces, requires extra prep, or needs just a little bit more concentration and caution then of course the labor hours go up.
And on top of that in this line of work sometime’s we’re getting into spaces or walls where we don’t even know what we’re going to find until we’re in there so sometimes contingencies need to be built in.
3. Margin: Why the Final Price Isn’t Just Materials + Labor
Here’s the part most people don’t talk about — the markup…
After we calculate materials and labor, we add a target margin. This isn’t just profit for us. It also covers all the other costs of running a business:
- Insurance and licenses
- Vehicles and gas
- Payroll taxes
- Tools and equipment maintenance
- Office support
- Marketing and scheduling
- Training, safety, and more!
But I promise we’re not greedy! Our goal is for you, the customer, to get real value for the price. We don’t aim for crazy margins. We aim for healthy, sustainable ones — the kind that keep good, high quality people employed and happy to help you with your problems.
Why Some Quotes Are Lower (or Higher)
If you see a big discrepancy in pricing, it could be because:
- They’re cutting corners on material quality
- They’re underestimating labor time
- They’re not factoring in overhead (and may not be around next year)
- Or maybe they’re just a more efficient company
If a quote is higher, it could be due to a company’s inefficiencies, higher overhead, maybe just plain greed… or maybe they’re higher quality and doing things the right way.
Everything’s relative here so it’s hard to know, just make sure you’re working with someone you can trust and know what you’re paying for. We do have ideas on how to find the right insulation contractor.
Does It Cost More to Insulate an Attic vs. a Basement vs. Walls?
Short answer? Yep. Different parts of your home come with different challenges — and that affects both labor and sometimes material choices.
Here’s the breakdown:
Attics
Attics are often the most cost-effective to insulate.
They’re usually wide open, easy to access, and fast to blow insulation into — especially with cellulose. That means lower labor costs per square foot, even if you’re aiming for a higher R-value (like R49–R60).
That said, if your attic is tight, filled with old insulation that needs removing, or has tricky venting and baffle issues — costs will go up.
Walls
Walls are a whole different beast.
If they’re open (like during a renovation), batt insulation is straightforward. But retrofit wall insulation? That involves drilling, dense-packing, and sometimes fishing insulation behind wires and braces.
More effort = more time = more cost.
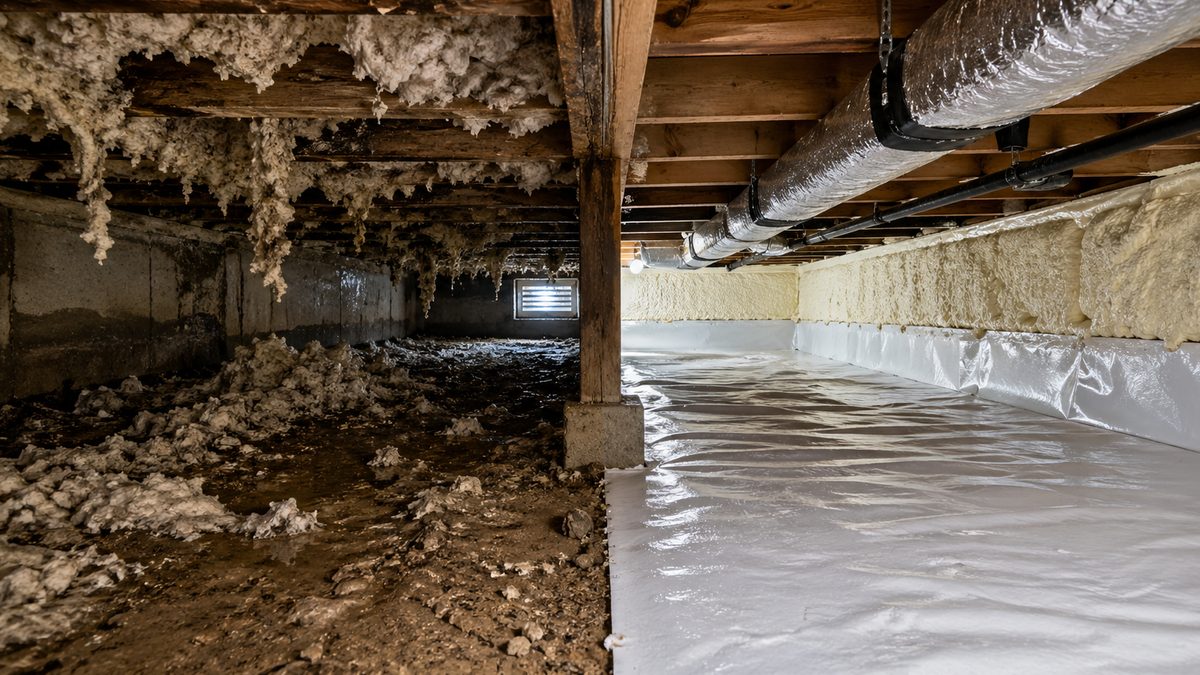
🧊 Basements & Crawlspaces
Basements and crawl spaces are the wild cards.
Low clearance? Dampness? Old stone foundations? All that slows things down. Sometimes we need to build out framing, deal with moisture barriers, or switch to spray foam to get proper air sealing.
It’s not always more expensive, but it’s usually more finicky, which affects both the labor and setup.
Bottom line:
Not all parts of your home cost the same to insulate — and that’s not us being inconsistent. It’s just different conditions needing different approaches. When we give you a quote, we’re factoring in the real-world challenges of each area so you don’t end up with surprises halfway through.
Common FAQ's about Insulation Pricing
How accurate are insulation quotes, and can the price change after the job starts?
Insulation quotes are typically accurate, but the price can change if hidden issues are discovered—like moisture damage or outdated wiring. Reputable contractors, like Nealon Insulation, will inform you before making changes, explaining the issue and any cost difference. Transparency and communication help avoid surprises during the project.
What happens if I already have insulation—do you remove it or work over it?
If your existing insulation is clean, dry, and intact, new insulation can often be added on top. If it’s damp, moldy, pest-infested, or compressed, it should be removed first. Nealon Insulation evaluates your current insulation during the quote and recommends the safest, most efficient approach for performance and cost.
Can I lower the quote by doing some prep work myself?
Yes, you can sometimes lower the quote by doing prep work like clearing access paths, moving stored items, or vacuuming dusty areas. These tasks save labor time. Ask during the consultation to confirm what’s helpful and what should be left to the pros for safety and efficiency.
Are there financing options or rebates to help cover the cost?
Yes, there are financing options and rebates available. EnergizeCT offers rebates for insulation upgrades in Connecticut, and federal tax credits may also apply. Many contractors, including us, help with the paperwork to make the process easier and ensure you receive the full benefit.
How long will the insulation job take from start to finish?
Most insulation jobs take 1–2 days from start to finish, depending on the size and scope. Attics are usually completed in a single day, while crawlspaces or wall retrofits may take longer. Your contractor should provide a clear schedule before starting—and stay on track.
Final Thoughts
Insulation isn’t glamorous, but it’s one of the best investments you can make in your home’s energy efficiency, comfort, and long-term health.
We believe in doing things right — pricing included. When you get a quote from us, it’s built through real time, effort, and deep thought to ensure we’re providing the highest quality work for the best value:
Materials + Labor + Margin = Total Price
It’s not rocket science. It’s just good business.
And when it’s done right, everybody wins.
Related Articles

Attic Insulation: What Actually Works in Connecticut Homes | Podcast
We finally did it—we launched a podcast. Why? Because sometimes you want to learn about insulation without reading a 2,000-word blog post on your phone in the middle of a Home Depot aisle.
And let’s be honest, hearing someone talk through this stuff makes it all a little less confusing (and a lot less boring).
The first few episodes tackle one of the biggest problem areas in any Connecticut home: the attic. We're covering everything from removing old insulation to figuring out which material actually holds up in a drafty, low-clearance crawlspace. We’ll walk through R-values, moisture resistance, rebates, and yes—why air sealing is always step one.
If you’ve ever asked, “Do I really need to rip out the old stuff first?” or “Is spray foam worth the price tag?”—this is for you. Short, sharp, and no fluff.
Heard something that made you wonder what shape your attic’s in? Or maybe you’re just ready to find out what insulation would actually cost for your place?

Best Insulation for Hard-to-Reach Attic Areas
Let’s be honest: most attics weren’t designed with comfort—or contractors—in mind. If you’ve ever tried to belly-crawl through an attic with 16 inches of clearance and a thousand nails overhead, you know exactly what I mean. These aren’t spacious bonus rooms. They’re tight, dusty, and full of surprises.
And that’s where the insulation challenge begins.
When your attic is tough to access—low-slope, tight joists, awkward framing—it’s not just harder to work in. It’s harder to insulate right. You need a material that fills every nook without needing a full crawlspace gymnastics routine. That’s why picking the best insulation for hard-to-reach attic areas isn’t just a good idea—it’s the difference between a high-performing thermal envelope and a waste of money.
In this guide, we’ll break down why some materials work better than others in tricky attic setups, what to avoid, and how to make the most of a tough space—especially if you live in an older New England home that’s seen a few winters.
Let’s get into it.
What Makes an Attic “Hard to Reach”?
Not all attics are created equal—and some are downright brutal. When we say hard-to-reach attic areas, we’re talking about more than just a tight squeeze. We’re talking about spaces that make insulation work feel like spelunking with a staple gun.
Here’s what usually puts an attic in the “difficult” category:
- Low Clearance: Think 2 feet of headroom—just enough space to bonk your head while trying to maneuver a hose.
- No Flooring or Walkways: If there’s no plywood to stand on, you’re balancing on joists like you’re on a tightrope.
- Tight Eaves and Angled Framing: The space tapers off near the edges, making it nearly impossible to reach corners.
- Limited Access Points: Tiny hatches or awkward closet openings can make getting materials up there a logistical puzzle.
- Obstacles Everywhere: Wiring, plumbing, ductwork, and other surprises block clean insulation runs.
These are the kinds of challenges that make blown-in insulation—whether fiberglass or cellulose—a smarter, safer bet than dragging in batts and hoping for the best.
Key Challenges of Insulating Tight Attics
Insulating a cramped attic isn’t just uncomfortable—it introduces a unique set of headaches that can wreck your energy savings if you don’t account for them.
Safety and Accessibility
Low clearance, exposed nails, and sketchy flooring make it hard (and sometimes unsafe) for crews to move around. That limits which materials can be used and how well they’re installed.
Insulation Gaps = Energy Loss
If you can’t reach the corners, heat will—by escaping through them. Gaps or thin spots mean you’re not getting the full R-value you paid for.
Poor Air Sealing
Tight attics often get skipped during air sealing. That’s a big miss—especially in older homes where warm air loves to sneak into the attic and right out the roof.
Moisture and Ventilation Issues
Limited airflow and blocked soffits are common in small attic spaces. Without baffles and proper venting, moisture builds up—leading to mold, wood rot, and insulation failure.
Top Insulation Options for Hard-to-Reach Attics
Let’s talk materials. Here are the top three insulation types that actually work in tight attic situations—and where each one shines.
Blown-In Fiberglass
This is our workhorse. Blown-in fiberglass:
- Installs easily with a hose—no crawling required
- Fills gaps around wires and framing
- Doesn’t settle much, so it keeps its R-value over time
It’s lightweight, reliable, and cost-effective. In a low-clearance attic, this is often the best all-around option.
Cellulose Insulation
Made from recycled paper and treated for fire resistance, cellulose:
- Packs tightly, blocking air movement better than fiberglass
- Is great for retrofitting older homes with weird framing
- Offers decent soundproofing benefits
It’s heavier and can absorb moisture, so make sure your attic is properly vented first.
Spray Foam (Spot Use Only)
Spray foam is powerful but situational. It:
- Seals air leaks better than anything else
- Adds a moisture barrier and structural strength
- Requires space and ventilation to install safely
In tight attics, we use it for sealing rim joists or trouble spots—not full coverage.
What’s the Best Choice for Your Attic?
So what’s the best insulation for your hard-to-reach attic? Here's the short version:
- Go with blown-in fiberglass if you want broad coverage in a tight space, fast and affordably.
- Choose cellulose if you’re dealing with an older home and want high-density performance.
- Use spray foam sparingly, for sealing specific gaps and edges—not the whole attic floor.
At the end of the day, the right choice depends on your attic’s structure, access, moisture levels, and budget. And whichever material you use, it only works if it’s installed thoroughly. Half-insulating a tight attic is like half-zipping a winter coat—looks fine until the wind hits.
Pro Tips for Insulating Hard-to-Reach Attics
Air Seal First
Before blowing in insulation, seal cracks, plumbing penetrations, and light fixtures. This prevents warm air from leaking into the attic and wasting your energy savings.
Install Baffles
Tight eaves can easily block ventilation. Use baffles to maintain airflow from the soffits to the ridge—especially in low-clearance areas.
Use Depth Markers
Mark your target R-value depth so you can verify even coverage. It’s easy to underfill areas when space is tight and visibility is low.
Leave Tricky Installs to the Pros
Walking joists with a blower hose in a hot attic isn’t for the faint of heart. If your attic’s a squeeze, hire someone who knows how to work in tight spaces safely and effectively.
Watch for Old Wiring
Homes with knob-and-tube or outdated wiring shouldn’t have insulation installed until the electrical is updated. Always check before you cover it up.
Why This Matters in New England Homes
If you’re in Connecticut—or anywhere in New England—you know the drill: freezing winters, humid summers, and homes that have been around since the Carter administration (or earlier).
Many older New England homes have:
- Low-pitched roofs with minimal attic space
- No insulation or outdated materials
- Weird layouts and tricky framing that make batts useless
Pair that with rising energy costs, and suddenly your attic’s a big deal.
The good news? Blown-in insulation is perfect for this. It fills every inch without major demo work. You get comfort, lower bills, and better performance—all without turning your attic into a construction site.
Common FAQ's about Attic Insulation
Can I still use my attic for storage after insulating it?
Yes, you can still use your attic for storage after insulating, but only with proper planning. Blown-in insulation can’t be compressed by boxes—it loses R-value. To safely store items, install a raised platform above the insulation or designate storage areas with rigid insulation and flooring.
Will insulating a hard-to-reach attic cause odors or dust in my home?
Yes, insulating a hard-to-reach attic can temporarily cause odors or dust in your home. Blown-in insulation stirs up fine particles and old debris, especially in older attics. A qualified contractor minimizes this with HEPA vacuums and sealing, but a light dusty smell for a day or two is common and fades quickly.
What happens if there are pests or rodent droppings in the attic?
If pests or rodent droppings are found in the attic, the contaminated insulation must be removed and cleaned before new insulation is installed. Rodent waste poses health risks and fire hazards. A reputable contractor will identify contamination during inspection and guide the cleanup before proceeding.
Can insulation improve comfort in the rooms below a tight attic?
Insulation improves comfort in rooms below a tight attic by reducing temperature swings and drafts. Proper attic insulation helps upper-floor bedrooms and offices retain heat and stay cooler in summer, especially in homes where heat escapes quickly through an under-insulated roofline.
Is it worth insulating a tiny attic that covers only part of the house?
Insulating a tiny attic is worth it because even small uncovered areas can cause significant heat loss. Partial attic spaces create thermal weak spots that reduce overall energy efficiency. Adding insulation to just a few hundred square feet improves your home's performance and cuts energy waste.
Final Thoughts
If your attic is tight, cramped, and tough to navigate, you’re not stuck—you just need the right game plan. And for most hard-to-reach attic areas, that means blown-in insulation like fiberglass or cellulose. It gets in, fills every nook, and performs without needing you (or a contractor) to play Twister between joists.
Here’s the quick takeaway:
- Blown-in fiberglass is versatile, affordable, and ideal for tight spaces.
- Cellulose is dense, eco-friendly, and perfect for older homes.
- Spray foam is great for sealing leaks, but not ideal for full coverage in low-clearance attics.
Whatever you choose, make sure it’s installed right—with proper air sealing, ventilation, and attention to detail.

What Is the Best Attic Insulation?
Let’s get one thing straight—there’s no universal “best attic insulation” for every home. That’s like asking what the best pair of shoes is without knowing if you’re running a marathon or going to a wedding. The right insulation depends on your attic, your climate, your budget, and—frankly—how long you plan on sticking around.
But here's what we can say: the attic is one of the biggest culprits when it comes to energy loss. Heat loves to rise, and without proper insulation up top, your home is basically wearing a winter coat with no hat. That means higher energy bills, drafty rooms, and HVAC systems working harder than they should.
In this guide, we’ll break down the most popular attic insulation materials—fiberglass, cellulose, spray foam, mineral wool—compare their strengths, costs, and R-values, and help you figure out what’s actually worth your money in 2025. Whether you’ve got a new build, a 100-year-old shoreline cape, or just a suspicion your attic's slacking off, this post is for you.
Let’s dig into what makes insulation great—and how to choose the right kind for your home.
What Makes Insulation ‘The Best’ for Your Attic?
Before we start comparing cellulose to spray foam like it’s a heavyweight title fight, let’s set the bar: what actually makes one attic insulation material better than another?
Here’s what we look at when choosing the best attic insulation:
R-Value (Thermal Resistance)
Think of R-value like the “warmth rating” on a sleeping bag. The higher the number, the better it resists heat transfer. In New England, you want an attic R-value between R-49 and R-60, depending on your setup and climate.
Air Sealing
Insulation slows down heat, but air sealing stops the drafts. Spray foam is the gold standard here—it does both. Dense-pack cellulose can help too. Fiberglass? Not so much.
Moisture Resistance
Insulation that soaks up moisture is asking for mold. If your attic lacks proper ventilation or has humidity issues, pick something that holds up—like closed-cell spray foam or mineral wool.
Longevity and Settling
Insulation is a “set it and forget it” kind of job—if it’s installed right. Spray foam holds its shape. Cellulose and fiberglass can settle if installed too lightly. Batt insulation? Depends on who installs it.
Cost vs. Performance
Spray foam has the highest performance—and the highest price. Cellulose hits the sweet spot for cost, coverage, and comfort. Fiberglass is cheap, but often leaves performance on the table.
👉 Bottom line: The “best” insulation is the one that fits your attic’s needs, not just your wallet.
The Main Types of Attic Insulation (Pros, Cons & What to Expect)
There’s no shortage of options, but these five are the ones we see most in Connecticut attics—and each one has its quirks.
Here’s the no-BS breakdown:
Blown-In Fiberglass
Pros: Affordable, quick install, moderate R-value (R-2.2 to R-2.7)
Cons: No air sealing, moisture-sensitive, settles over time
Best for: Open attics with good airflow and low moisture risk
Dense-Pack Cellulose
Pros: High R-value (R-3.2 to R-3.8), air sealing capability, pest/mold/fire resistant, eco-friendly
Cons: Can settle if under-packed, doesn’t like moisture
Best for: Older homes, retrofits, irregular cavities
Spray Foam (Closed Cell)
Pros: Highest R-value (up to R-7), air seals, moisture barrier, long-lasting
Cons: Expensive, must be professionally installed
Best for: Rim joists, vaulted ceilings, hard-to-reach areas
Fiberglass Batts
Pros: Cheap, easy to install (DIY-friendly), decent R-value
Cons: Poor fit = poor performance, no air sealing, vulnerable to compression
Best for: Simple, accessible attics with standard joist spacing
Mineral Wool
Pros: Good R-value (R-4+), fireproof, water-resistant, soundproof
Cons: More expensive than fiberglass, harder to find
Best for: Moisture-prone or fire-rated assemblies
Attic Insulation Comparison Table
Best Attic Insulation for Different Situations
Let’s match the material to the attic:
- Cold Climates: Closed-cell spray foam or dense-pack cellulose. Seal the leaks, then insulate deep.
- Humid Climates: Radiant barrier plus fiberglass or open-cell foam.
- Older Homes: Dense-pack cellulose + foam at rim joists and access points.
- New Construction: Closed-cell spray foam or hybrid (foam + cellulose).
- DIY Projects: Fiberglass batts or rental cellulose blower kits (if you know what you're doing).
Bottom line: Match the insulation to your home—not the other way around.
What R-Value Do You Really Need in Your Attic?
In Connecticut, aim for R-49 to R-60 in your attic. If you already have R-19, you can add to it.
R-Value by Material (Per Inch)
- Blown-in fiberglass: R-2.2 to R-2.7 → ~18-22 inches needed
- Cellulose: R-3.2 to R-3.8 → ~13-15 inches
- Open-cell foam: R-3.5 to R-4.0
- Closed-cell foam: R-6 to R-7
- Mineral wool: R-4 to R-4.2
And don’t forget: Air sealing comes first. Always.
Common Attic Insulation Mistakes (And How to Avoid Them)
Let’s save you the expensive redo:
- Skipping air sealing: Insulation without sealing is like socks in wet shoes—pointless.
- Choosing solely on price: The cheapest option often costs more in the long run.
- Ignoring ventilation: You need airflow, or you’ll end up with mold.
- Reusing old insulation: If it’s saggy, moldy, or mouse-nested—remove the insulation.
- Leaving the hatch uninsulated: Your attic access is a massive weak point. Seal it tight.
So… What’s the Verdict?
If you’re just looking for the straight answer:
- Best all-around: Dense-pack cellulose
- Best performance: Closed-cell spray foam
- Best combo: Foam for air leaks + cellulose for coverage
Common FAQ's about Attic Insulation
How do I know if my attic insulation needs to be replaced?
You should replace attic insulation if it's sagging, wet, moldy, chewed by pests, or over 20–30 years old. Rising energy bills, drafts, or uneven room temperatures are also warning signs. Poor installation, moisture, or critters can shorten insulation life—if it's never been inspected, it's likely due for a checkup.
Can I add new insulation on top of the old stuff?
You can add new insulation over old material if it's dry, mold-free, and not compacted. This method is cost-effective and helps meet attic R-value codes. However, if the old insulation is damp, damaged, or pest-infested, it should be removed first to avoid trapping moisture or odors.
How long does attic insulation typically last?
Attic insulation typically lasts 20–30 years if installed properly and kept dry. Spray foam can last even longer. Moisture, pests, and settling can shorten its lifespan. If you notice uneven temperatures or higher energy bills, it’s smart to have your attic insulation checked every 10–15 years.
Will new attic insulation qualify me for rebates or tax credits?
Yes, new attic insulation can qualify for rebates and tax credits in Connecticut. Programs like EnergizeCT and the federal Inflation Reduction Act offer incentives for energy-efficient upgrades. To qualify, you’ll need proper documentation, including receipts and possibly a home energy assessment, typically submitted by your contractor.
Conclusion: Insulation Is an Investment—Do It Right
Insulation isn’t sexy, but it saves you money, boosts comfort, and protects your home from the elements. Get it right the first time, and you won’t have to think about it again for 30 years.
Let's Work Together
Ready to transform your home into an energy-efficient haven? Schedule your free energy assessment today and experience the Nealon difference for yourself.